Creative DIY Flower Pot Idea To Copy
Today I have a creative DIY flower pot idea that you can copy and make yourself. Recycling and creating something beautiful for your home is a win-win! Let’s get started by seeing what this looked like before, and how to transform it.

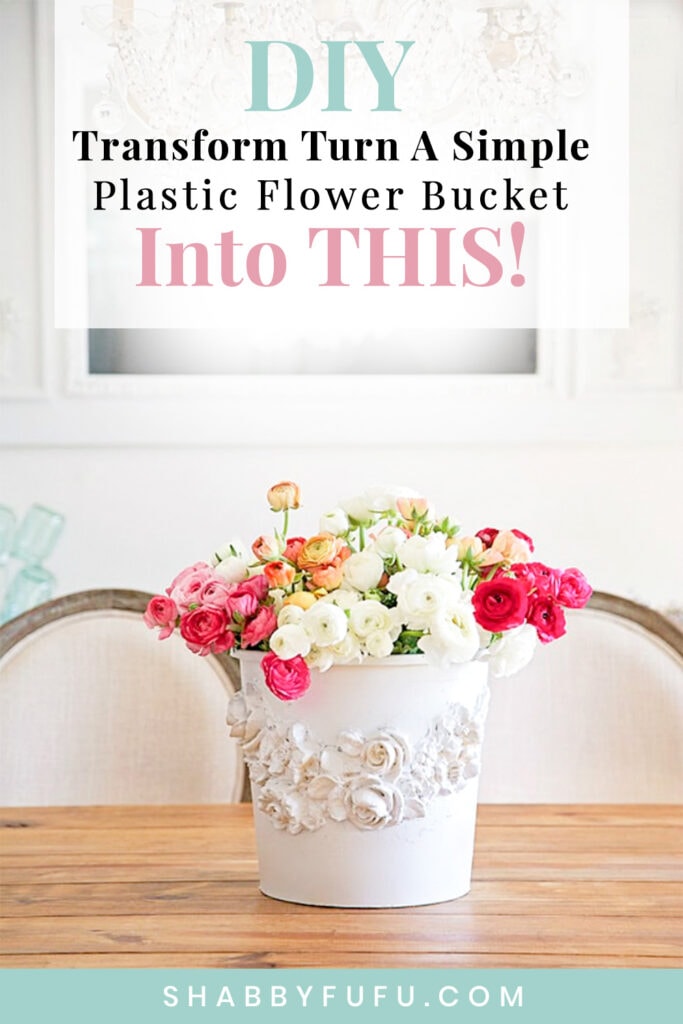
Creative DIY Flower Pot Idea
Definitely this flower container is a beauty…don’t you think? It’s perfect for holding my weekly flowers and started out being (for lack of a better word) UGLY! It all happened with a trip to Trader Joes and if you keep your eyes open for inspiration everywhere, you’ll never know what shenanigans might ensue.

The black plastic flower bucket that was sitting behind the counter at Trader Joes with my flowers on hold.
My love affair with ranunculus hits every Spring and is still going on big time this week. The season of availability is short lived and I’m enjoying my latest bucket full that I picked up at Trader Joes yesterday. I’ve been calling there every day because I needed some for an upcoming project! So I was happy that they saved these for me yesterday, but sad that these are the last of the season.

As you can see…they were so good about marking them for me. Traders is great about things like that:~)
I asked if I could take the ranunculus home that way, because I had several other errands to run and I knew that the bucket would sit nicely on the passenger seat in my SUV and keep the flowers fresh. I started thinking…hmmm, creative DIY flower pot idea! That’s how things pop into my head.

It was the perfect medium size and my wheels started turning to repurpose mode. I remembered that I had some extra large rose furniture appliques on hand. You can find the APPLIQUES HERE.
Since the bucket is round, I carefully warmed up the resin applique by heating on a low temperature in the microwave to make it more pliable. My husband was here and tried to figure out the best way to bond the two together.

He tried using latex caulk and then clamped the two together. We let it set overnight.

It held fairly well, but I decided to give it extra holding power by going around the edges and sealing with my hot glue gun.
After everything was set and holding well, I took the bucket outside and gave it a coat of white spray paint from Rustoleum’s American Heirloom line in white.

A plain drab ugly duckling of a utilitarian container went from this (above).

To this…
Not sure that it’s completely finished. I might add some antiquing medium to age it, but I’m happy with it for now.
Not sure that it’s completely finished. I might add some antiquing medium to age it, but I’m happy with it for now.

Did you know that you can preserve the life of your florals if you store them in the refrigerator at night?


So beautiful Janet!! Love this!
do you know another way to do “appliques”? I have used spackling compound with stencils; lay it on a little thick, then slowly peel the stencil off, let it dry! and you do this on the object you want it to be on! it’s so easy!!! I’ve done it on doors, fireplace mantel, anything!!!!
Love your bucket makeover/rescue! Beautiful photography.
hugs
Sissie
Adorbs!!!
Happy weekend,
Kelley~
Gorgeous, now to find a bucket and something beautiful to put on it.
I don’t think I can obtain one of those florist buckets and I don’t have the stuff to bend the roses. I might try it on a container with flat surfaces. Very pretty!
Oh my goodness, what a wonderful idea! I would never have guessed that was originally a black plastic plant bucket!!!
Are you KIDDING me? Thats' what that gorgeous bucket started out as? Whoa…..LOVE! 😉
So gorgeous! WOWZA
Wow! Says it all!
How cool and cleaver…love it !!!!!!!
What a fantastic idea….it looks amazing!!
Oh my gosh, what an absolute fabulous idea! it turned out gorgeous!
hugs,
Jann
What an amazing idea, Janet! Ranunculas are my favorite flowers, too!
JP
Bonjour Janet
C'est une génial idée et le rendu de ta réalisation est magnifique !! Voilà une belle idée que je vais mettre dans un coin de ma tête pour les pots noires qui sont en attente dans la cabane de jardin 😉
Merci ma douce et à très bientôt
Pascaline
wow! this is great!
Janet:
You are so talented and creative that I am in awe of you. The plastic bucket transformation is unbelievable!
Love this Janet!
Oh my how creative and beautiful! Do you mind me asking, where does one get furniture apliques?
This is so cool and those flowers are gorgeous!
This is just beautiful!!! I have to find some of the appliques! Thanks for sharing!
Beautiful
Very inexpensive and creative container. It looks great!
Never would have guessed that was a bucket from the garden center and a furniture applique. So clever and super gorgeous!! Pinned and shared
Wow I love the way you decorated the container and made it look so pretty! I co-host a blog party on Monday's called Cooking and Crafting with J & J Link Up at Julie's Lifestyle. I would love to have you come and share this with us. Thanks.
Julie
How totally brilliant! I LOVE this! and thanks for the flower tip!
Jenna
How clever is this! Wow, you would never know that was a simple plastic flower bucket underneath. Pinning to share – you're good!
Love this – gorgeous!
What super cute makeover. Love it! Thanks for linking up to Merry Monday! Sharing on FB! Have a great week!
Kim
I would have never considered keeping that plain black container. They are not pretty, but you made me think twice about tossing them now… Pinned!
Now that is one awesome transformation! Love those fabulous flowers! Thanks so much for sharing your creativity at the The DIY Collective this week! Please come back next week to show off your latest project!
Have an awesome weekend!
~ Ashley
wow…SO beautiful! <3
It just goes to show that you don't need a lot of money to create beauty. Very inspiring
amazingly creative and cleverly executed
Beautiful !
Did you pay $26.10 plus shipping for the applique?
Just wondering where you could find them cheaper?
These are huge appliques but you can try making appliques yourself with some tutorials I’ve seen out there
I picked up ceramic/china flowers for. years at estate/yard sales. I took three of my father’s galvanized buckets, painted them pastels on each of the insides, light blue on one, pink on another, sage green on the other insides, used caulking to affix the flowers to the outsides of the pails, and painted shabby white on the outside and the flowers. One of my favorite projects and a wonderful memory from my father. I love what you did.
Those sound like something that I would love to try Eileen…but I sold all of my porcelain flowers!!